Tag: Travel

Blog Posts

The Washington Monument

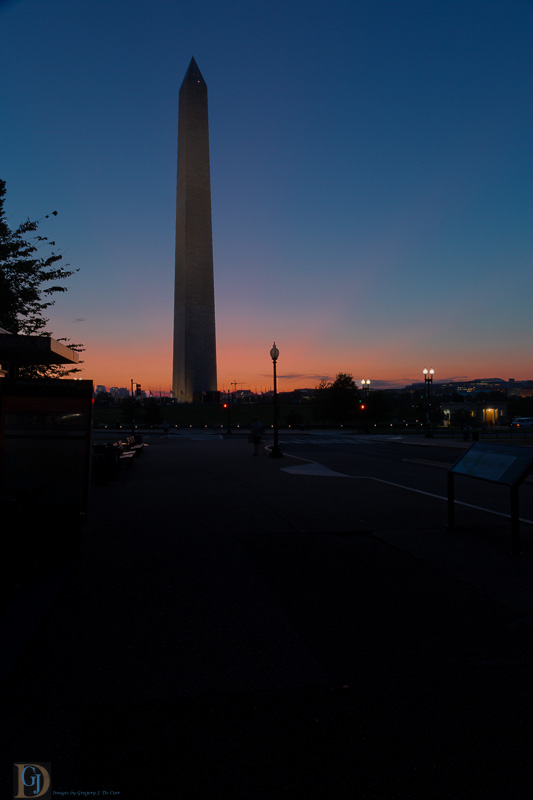
If you view any YouTube Videos about photography, you occasionally hear the term “working a photo” or taking many photos of the same subject. This is something that I have been trying to do recently as a method to hopefully improve as a photographer. A few days ago, I spent an evening in Washington, D.C. photographing the Washington Monument.

First, I decided to do my photography in the evening to employ the lighting from prior to sunset and through the blue hour. I checked the Photographer’s Ephemeris App for the sunset time and location. The plan was to have the monument backlit and hopefully a colorful sky behind it. This worked out well in helping me position where to set up my camera and tripod. Whether or not there would be a colorful sky was up to Mother Nature!

I was shooting from around 7:00pm until 9:15pm. I stayed in the same location the entire time to have nothing change but the lighting in the sky. The photos below were all processed differently, some in Adobe Lightroom, some in Adobe Photoshop and some in both. Only one photo was cropped. The evening was enjoyable both from a photography perspective and from a people watching perspective. The world is full of interesting characters and some tourists are at the top of the list! I hope you enjoy viewing these photos and perhaps you will go out and try something similar yourself.

Washington Monument in Evening-7298-Edit

Washington Monument in Evening-7311

Washington Monument in Evening-7326

Washington Monument in Evening-7351-Edit

Washington Monument in Evening-7393-Edit

Washington Monument in Evening-7411-Edit

Washington Monument in Evening-7407

Please come back to visit www.cestlavie4me.com to see where I go with my photography in the future.

Blog Posts

Philadelphia Panorama Photos

The title for this blogpost makes use of the letter P three times and that is a lot. It is also appropriate because this blogpost is about taking many photos and creating a panorama. It is also a blogpost that prominently (another P) displays my rather poor skill in shooting panoramas. That is ok because this blog is about my journey to becoming a better photographer and what I learn along the way.

Last week, my wife and I took a day trip to Philadelphia and I brought my camera and tripod along specifically to try a few cityscape panoramas. I had only done one panorama before this attempt; therefore, I thought it was time to explore the technique. I decided to not look at any videos beforehand to prepare myself just to do something different as a challenge. I am guessing that some of you readers also experiment this way but most probably try to learn a new technique prior to putting the camera on a tripod. The later technique certainly makes more sense than my approach, but I like to take risk!

I made quite a few mistakes and these photos show those errors, but I think I did learn a lot in this experiment. Rather than list all of my mistakes, I’ll let you look at the photos and figure out what went wrong for yourself. I read in a photo magazine that analyzing photos done by others is a good practice to help you refine your own skills, so hopefully these photos will help all of you!

The three photos below were all taken from Camden, NJ looking across the Delaware River towards Philadelphia. I used Adobe Lightroom to stitch the photos together into a panorama. The first photo is a monochrome conversion that consists of 7 individual photos.

untitled shoot-5036-Pano


The next photo was taken from a similar location and consists of 6 individual photos.

untitled shoot-5042-Pano


I tried a different approach on the next photo and used 12 individual photos for it. It should be clear what went wrong with this photo.

untitled shoot-5081-Pano

After going to lunch with my wife at a riverside sports bar we drove across the Benjamin Franklin Bridge into Philadelphia. I wanted to take a photo from the South Street Bridge near the University of Pennsylvania campus. This panorama consists of four photos. This was probably the best photo of the group.

Autumn in Philadelphia

When I returned home it was time to go to my photography school of choice, YouTube.com. There are many great videos here and I found several on creating panoramas. After viewing these videos and then looking at my photos I can certainly see how to do an improved panorama photo shoot on my next opportunity. Hopefully, you managed to dissect these photos, and in the process learned more about taking panoramas.

Please come back to visit www.cestlavie4me.com to check on my progress in becoming a better photographer.

Blog Posts

The Mountain Festival

A few weeks ago, the family decided to take a day trip to West Virginia to attend the 43rd Annual Mountain Heritage Arts & Crafts Festival. I decided to bring my camera and check out any good photo opportunities. The festival itself was a great deal of fun! I managed to eat a lot of food and even bought some canned items to bring home. My wife, daughter and granddaughter bought magnetic bracelets constructed of semi-precious stones that are supposed to block pain. If you are interested check out the website below. I have no connection to this business or any way to know if the magnets work as advertised but the bracelets are attractive!

www.uniquemagneticjewelry.com


The festival offered many great photo opportunities and I am posting a few pictures in this post. I decided to focus on a blacksmith theme. I also wanted to be creative in using Adobe Photoshop and Lightroom to test my skills. The first photo is an anvil and I tried to bring out the texture in the old metal.

Mountain Festival-4884

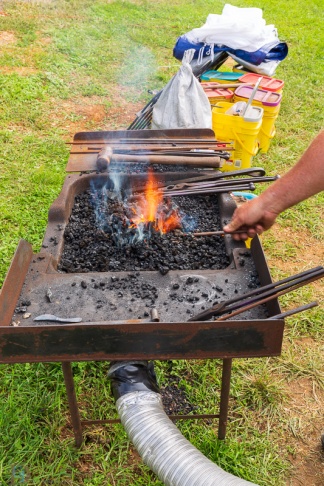
The next photo is of the furnace that the blacksmith used to create his metal objects d’ arte. I finished the photo by using the Patch Tool in Photoshop to remove the clutter in the background. It was amazing to see how well it turned out. There are a few errors but with practice my skills should improve.

Mountain Festival-4887  Mountain Festival-4887-Edit

The next photo is of the blacksmith working on a heated metal rod that he was shaping into a plant leaf. I had his full attention because no one else was around, so he answered a lot of my questions. When he finished he gave me the leaf that he had just fashioned. It is now hanging on the bulletin board in my office! Since it was a photo of a blacksmith, I thought it would look better as a monochrome image. This was converted from color to monochrome in Adobe Lightroom. I also used one of the new monochrome profiles, number 6, that was included in a recent update to Lightroom.

Mountain Festival-4890  Mountain Festival BW-4890

This was a fun outing and it even gave me a few good photos to add to my collection. Please come back to visit www.cestlavie4me.com to see more of my photo journey to becoming a better photographer.

Blog Posts

Post-Processing Explored

My first camera was a small Kodak Instamatic. I’m sure most of the readers of this blog have no idea what that is or for that matter even care! To tell you the truth, it was so long ago I had forgotten what it looked like myself. So, a quick visit to Wikipedia restored my lost memory! Kodak Instamatic

But, just as way of clarification, it was a small plastic film camera. You just snapped the picture; therefore, we called the resulting photos snapshots. When you had finished your roll of film, typically about 12 pictures as I remember, you would send the roll to your local lab or drugstore to be developed and have prints made. It was a lot of fun opening the envelope and looking at your photos for the first time. There was no such thing as an LED screen on the back of your camera back in those ancient times! Sometimes the surprises were not too pleasant. It was not unusual to have several severely underexposed photos. Also, if you hadn’t advanced the film properly, you might have partial images on your prints. We don’t have time to talk about how you had to insert or remove the film in the camera in this blog!

 Today most of us are taking a photographs by using a digital device. Either a DSLR or a mobile phone. In any case we can quickly see the photos and with the available software manipulate the image almost instantly. In the last couple of years, I have rekindled my interest in photography and as the readers of this blog know I have been trying to document my progress as an amateur photographer in this blog. Today I want to share some of my photos with you; but I also want to share what the photos looked like before any adjustments were made with Adobe Lightroom and or NIK software.

 Recently, I was in Pittsburgh for a very short visit and had the opportunity to photograph several scenes around the city. One of the first areas that appeared in my viewfinder was the Strip District. This is an older part of the city near downtown the filled with shops, restaurants, grocery stores and even furniture stores. It has become a busy area for both locals and tourists. The photo below is a street scene from the Strip District. This photo was taken in the early afternoon and the sky was extremely bright. The photo right out of the camera was rather dark as you can see from the screenshot below.

 Unadjusted Street Scene

After processing this photo in Adobe Lightroom I was able to recover a lot of the detail in the shadows and darker areas and the resulting photo is pretty decent. Below is the screenshot from Lightroom when I had finished processing the photo.

 Adjusted Street Scene

Here’s a better view of that photo.

Adjustments made in Lightroom


The next shot was a view of the city skyline from the 16th Street bridge near the Strip District. Again, the sky was very bright, so the resulting photo was dark as you can see from the screenshot below.

 Unadjusted Cityscape

Again, after working through Photoshop I managed to recover a lot of detail and I’m very satisfied with the resulting photo. Below is the screenshot showing some of the Lightroom adjustments that were made.

 Adjusted Cityscape

Here’s a better view of that photo.

 Adjustments made in Lightroom (2)

As we were walking around the downtown area we passed an alley and I thought it would make an interesting photo. When I uploaded this photo to my computer I decided it would be a much better picture if I processed it is a monochrome image. Below is the screenshot of the image before I started to process it.

 Before any adjustments

After I had worked the photo in Lightroom I decided to move it to NIK’s Silver eFex software. Below is a screenshot showing the photo after adjustments in both Lightroom and NIK.

 After adjustments in Lightroom and NIK

Here is a better view of this photo. I think the resulting image is very moody and somewhat mysterious. This is probably my favorite photo of the ones I took on the trip to Pittsburg.

 Adjustments made in Lightroom and NIK

As I have mentioned before in previous posts this blog is not about how to instruct you in doing anything because I’m just learning myself. What I do want to do is continue to share my progress as an amateur photographer. To this point I feel that I am making reasonable progress with my new hobby. I can also see that I have a long way to go in the areas of correctly using the exposure triangle, composition and post-processing, but progress is being made. Please come back to visit www.cestlavie4me.com  in the future.

Blog Posts

New York Scenes

One of the most photographed and photographable cities in the world is New York City. Everywhere you look it seems that a great photograph is just waiting to be taken! The skyscrapers, skyline, Financial District, Central Park, Broadway and the theatre district, river views, harbor, churches, and street scenes everywhere are a photographer’s delight! The key problem is to find a shot that hasn’t been taken a million times before. Perhaps the best bet is to try and take a photo in a somewhat unique style or from a non-traditional point of view.

A few days ago, I spent a couple of hours on Manhattan Island attempting to photograph some sights without taking the same photos I had seen before. It was a very challenging enterprise and I did not always succeed. The beauty of photography in New York is even when you fail at an attempt to photograph something in a unique manner, you still end up with a nice photo! The following are a few of the photos from my day in New York.

It seems you can get any information you need via a smartphone.

Get Info Here?

                                                    Get Info Here?

There are millions of people in New York and sometimes it may feel that even the signs are watching you!

 Who's Looking?

Who’s Lookin?

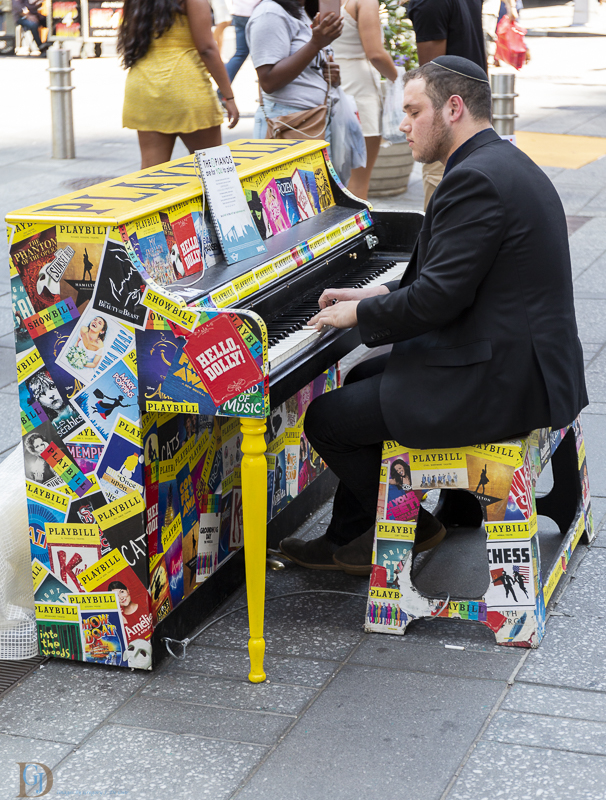
The New York Theatre District features some of the most famous musicals in the world. It just so happens that there is also music on the streets.

Mazel Tov

Great music. Mazel Tov!

The traffic is always heavy and it is difficult to catch a taxi, Uber or Lyft in NYC, but there are other means of city transportation.

It's the Hat!

It’s the hat!

New York can feed your body and your spirit!

Food Carts and St. Patrick's

Food Carts and St. Patrick’s

Please come back and visit www.cestlavie4me.com to check out more of my photographic exploits.

Blog Posts

Family Vacation Photography

I suspect that many of us tend to photograph in a somewhat solitary manner. We go out on a photo shoot usually with just our camera, bag, tripod and our thoughts. If we do go out with someone else, it is usually better if they are also a photographer. Taking time out during a family vacation or group activity to photograph something other than your family members or the group will not make you the most popular person that day.

There are many times during something like a family vacation or group outing where you can plan ahead and carve out some time to take photographs without interfering with everyone else’s activity. I had this opportunity during the past week when my wife and I went on holiday with our grandchildren, daughter and son-in-law. My daughter found a beautiful house that was available for short-term rentals in the Pocono Mountains of Northeastern Pennsylvania.

The Mehoopany Creek which is a tributary of the Susquehanna River was just a short walk down the mountain from the house. A small stream flowed from near the house down to the creek and provided some nice photo opportunities. I found an area that had a small waterfall. Early one day before everyone was up I went to the waterfall and took some photographs. In this post I decided to show the before and after version of one of my photographs. I used Adobe Lightroom Classic for the edits. So even when you are on a family vacation or with a group, if you plan ahead you can find some time to enjoy your photographic hobby. Just remember not to abuse the opportunity or you’ll become that person constantly getting the evil eye while you are taking your photos!

Singing Waters Creek

Before Editing in Adobe Lightroom Classic

Singing Waters Creek

After Editing in Adobe Lightroom Classic

Please come back to visit www.cestlavie4me.com to track my progress as a hobbyist photographer.

Blog Posts

Hand-Held Panoramas

Some images shout out to be created as a Panorama. This sometimes gives the viewer a much better perspective of the subject and sense of place than a standard photograph. One of the primary tools for great panoramic shots is the use of a steady tripod. Unfortunately, in my case I did not have a tripod on a recent day-trip to Baltimore, Maryland. I do, however, carry a bean bag in my camera bag that I sometimes use as a support for my camera.

My wife and I visited the World Trade Center in Baltimore and on the top floor there is a great observation room with a 360-degree view of Baltimore. I was up for the challenge of attempting panoramic shots without a tripod. Just to make matters a little more difficult, I had to shoot thru the somewhat dirty and streaky glass windows of the Observation Room! So, I proceeded to find spots where I could anchor the bean bag with the camera either on top or pressed against the side and then went to work.

Here are four photos that are each made up of three images. I used Adobe Lightroom to process and combine the images into a panorama. I doubt if any of these photos would win a photography contest prize; but I was very pleased with how well they turned out considering the challenges of hand-holding a camera for panoramas!

Port of Baltimore

Baltimore Marina

Baltimore City Center

Baltimore City Center

Later in the day, we visited The Basilica of the National Shrine of the Assumption of the Blessed Virgin Mary, also called the Baltimore Basilica. It was the first Roman Catholic cathedral built in the United States and was among the first major religious buildings constructed in the nation after the adoption of the U.S. Constitution. This gave me the opportunity to try a panoramic shot indoors in low light. I again took out my bean bag and took some photos of the altar area. Even with people in the scene the four-image panorama came out well!

Altar

I would always prefer a tripod to a bean-bag, but, it seems that you can make a decent panorama by hand-holding with the help of software like Adobe Lightroom. Now might be a good time for you to take out your camera and try the same technique. Keep on shooting!

Blog Posts

Old Point Comfort Lighthouse

A few weeks back my wife and I took a short drive to Hampton and Norfolk Virginia to enjoy a middle of the week holiday. In addition to eating great seafood I did go out for a couple of photo shoots. One of my goals was to focus on making sure I shot a subject from different viewpoints. I did this at the Point Comfort Lighthouse at Fort Monroe near Hampton. Here is some background on the Point Comfort Lighthouse:

“With the establishment of the United States government and its ensuing lighthouse projects at places like Cape Henry, pressure mounted to build a permanent aid to navigation at Old Point Comfort. An early edition of the American Coast Pilot noted the 1798 law passed by the U.S. Congress that set aside $3,050 for a light at Old Point Comfort and proclaimed: “We wish, for the security of navigation, that the important work may soon be undertaken, for the safety of our mariners.” Between 1800 and 1801, Congress appropriated another $5,000 for construction costs, and contracted the services of Elzy Burroughs to complete the octagonal stone structure.

Burroughs completed most of the work on the lighthouse, which stands fifty-four feet high, during 1803. The tower possesses a spiral staircase composed of hand-cut stone, stacked strategically on top of each other. The stairs lead to a ladder that ascends to a trap door, beyond which is the lantern room. Ten oil lanterns, which consumed 486 gallons of oil each year, were set in reflectors to produce a light that could be seen from fourteen miles at sea.”

Source: http://lighthousefriends.com/light.asp?ID=444

When I was editing these photos, I decided to try something new. The sky in one photo was a dull, washed out gray, so a sky replacement was in order. Since this photo had some trees, I decided to try to use the Channels Selection method in Photoshop which I believed would make a better selection. After viewing several videos on YouTube and more than a few attempts at this method, a final product was created.

This is the original photo with only a minor set of adjustments in Lightroom, I also started the adjustments by utilizing the new Profiles feature in Lightroom “Modern 10”.

Old Point Comfort Lighthouse

This is the same photo with the sky replaced by removing the dull, gray sky via a Channels Selection process.

Old Point Comfort Lighthouse

The next photo is from a different viewpoint and taken the next day, so there was a better sky as the background. I also used the new Lightroom Profile “Modern 10” to begin the editing process.

Old Point Comfort Lighthouse

There are a few more photos to share from this trip, but I’ll save those for the next post. Thanks for visiting and please come back to see what progress I am making in becoming a better photographer.

Blog Posts

Patience

My wife and I recently took a short trip to southern Virginia for a midweek get away. One of the areas we visited was Virginia Beach. Anticipating some picturesque photographic locations; I reviewed the Photographer’s Ephemeris to check both sunrise and sunset perspectives for an old fishing pier that jutted out into the Atlantic Ocean. For no reason other than I did not want to wake up early, I decided on a sunset photograph.

The weather that day started out as a partly cloudy, early spring morning. This gave me the distinct impression that the evening sky might just have a lot of color and provide the opportunity for a very nice photograph. That evening we drove to the beach and I got out to see where I should set up my camera and tripod. Since it was a somewhat cool evening only a few people were on the beach and I thought that I was very lucky to be here at this time with an unobstructed view. My subject was an old abandoned fishing pier that was quite weathered in appearance. I looked at several different compositional viewpoints and proceeded to take photos under the pier and looking towards the pier. By now, the sky was starting to look a little more threatening than it had earlier in the day and I began to think a rainstorm may come up and ruin my opportunity for photography. By now it was approximately 5 pm and sunset was slated for 7:30 pm; therefore, the Golden Hour would commence around 6:30 pm. Here are two of the photos shot after setting up.

Fishing Pier

Quiet Storm

The deteriorating weather encouraged me to return to the car with my camera and tripod. At first, the plan was to sit and wait but we were both getting hungry. It appeared that there would be sufficient time to grab a quick bite to eat and then return to the beach for the Golden Hour. So, my wife and I drove to a nearby seafood restaurant named Hot Tuna and were told by the hostess it would be approximately 15 minutes before we were seated at a table. After waiting about 15 minutes, I asked the hostess how much longer and she replied, “about another 15 or 20 minutes.” Now I was beginning to get quite worried that that we would not get back to the beach in time for any sunset photos. As I looked out the window the sky was turning very dark and within a few minutes it began to rain, and the wind began to intensify. I thought to myself that the evening for photography was pretty much finished!

Resigning myself to the fact my photography evening was probably finished the hostess finally came over and said our table was ready! The good news is the food was excellent. The bad news is, just as we started eating the rain stopped, the wind slowed down, and the sun drifted towards the horizon and began to light up the sky and clouds with the most beautiful colors! I couldn’t believe my terrible luck. We were not yet finished eating and the sky was filled with brilliant colors. I glanced at my watch and it was almost 7 PM. My wife encouraged me to go to the beach anyway and still try to take a few photographs. So, we paid our bill and ran out to the car and quickly drove back to the beach.

During the walk to the pier, the sky was getting darker, the sun was sinking more, and the sky was not quite as brilliant; but there was still some good color left. I set up my camera and looked through the viewfinder to focus on the pier and was unable to lock-in with the autofocus. I then turned on live view and attempted to focus in manual mode. After a few twists of the focusing ring it seemed that the pier was in focus, so I proceeded to take several photographs. My chimping was constant and the LCD screen gave me the impression that I had several good photographs. The histogram also looked good. I could hardly contain my excitement at having obtained some good sunset photographs.

Days later at home, I uploaded the photos to my computer and much to my horror none of the shots of the pier were in sharp focus and as result the photos were useless! There are two valuable lessons that came out of this experience for me. The first and most obvious one is to not leave your location until you have finished photographing the subject. I never should’ve left for the restaurant! The second lesson was that I needed to learn how to better focus in low light situations. Since then I’ve done some research and now have a better idea of how to handle low light situations with a wide-angle lens. Here is one of the photos I took that evening and you can clearly see how out-of-focus the pier is because of my inability to manage a low light situation.

Storm Clouds

As I’ve said before my purpose in blogging is to document my photographic journey to becoming a better photographer. This episode did not result in any great photographs, but I did learn some valuable lessons that should help me tremendously in the future. Please come back to see where my photographic journey takes me next. In the meantime, keep on shooting!


Blog Posts

Library of Congress Jefferson Building

There are many spectacular public buildings in Washington, D.C. and one of the best in my opinion is the Jefferson Building of the Library of Congress. The Library is a complex of 3 buildings in Washington, D.C. directly across the street from the U.S. Capitol. Click the link below to learn more about the United States Library of Congress.

https://loc.gov/about/history-of-the-library/

 The three buildings in this complex are the Jefferson, Adams and Madison; all are named for former presidents of the United States of America. The jewel in this collection of great architectural edifices is the Jefferson Building. Click here for more information on the Jefferson Building.

https://www.nps.gov/nr/travel/wash/dc79.htm

 The vast majority of this building is open to the public and there are always many tourists and others taking pictures throughout the facility. The major exception is the exclusion of photography while in the Main Reading Room. This exception is lifted twice a year and the public can bring their cameras into the room and photograph as much as they want.

 October 9th was the most recent date that the Main Reading Room was open for photography. I arrived early and was greeted by a line of people waiting to enter the room! It was so very crowded that I could hardly find a place to stand to take a photograph. As it turned out, I did manage to capture a few good photos. The only one from the Main Reading Room that I am posting is my favorite because of the perspective. You cannot bring a tripod into the room, so I had to use a bean bag for stability. This worked well enough with the exception that I could not see the LCD display or look through the view finder to frame the composition. I took about 20 shots and constantly adjusted the position of the camera to reframe the photo. This is the shot of the dome and columns that resulted from this exercise.

 Main Reading Room Dome

I decided that if everyone was in the Main Reading Room, it might be a good idea to move to another area and take some photos. This worked out well and here are some photos from the Great Hall of the Library of Congress.

 Great Hall Ceiling

Great Hall Ceiling


Great Hall 2nd Level

             2nd Floor of Great Hall


Great Hall 2nd Level

Great Hall Columns and Arches

Finally, here is the front of the Jefferson Building.

 Main Entrance

Jefferson Building

If you visit Washington, D.C. make sure to plan to spend several hours at the Library and in particular the Jefferson Building. You won’t be disappointed, and it’s free!